Disclosure: As an Amazon Associate, we earn from qualifying purchases.
Achieving a café-quality cup of coffee at home hinges far more on your grinder’s mechanical precision than on the price tag of your brewing machine. Over time, friction, coffee bean debris, and factory tolerances cause burrs to shift out of alignment, resulting in uneven particle sizes that ruin an otherwise great brew. Calibrating your coffee grinder restores its baseline accuracy, ensuring that a micro-adjustment on your adjustment dial translates directly into a predictably uniform particle size in your portafilter or brew basket.
Quick answer: Calibrating a coffee grinder involves establishing its true "zero point"—the exact threshold where the spinning and stationary burrs touch without rubbing. Finding this baseline allows you to accurately align burr spacing, eliminate particle size inconsistency, and systematically adjust your grind size to hit target extraction yields between 18% and 22% across various brewing methods.
Understanding Calibration and Burr Alignment Dynamics
Every burr grinder operates on a precise mechanical gap measured in micrometers (microns). Flat burrs and conical burrs rely on parallel or concentric alignment to crush roasted coffee beans into uniform fragments. When a grinder leaves the factory, its physical setting markings do not always correspond perfectly to actual burr distance. A setting labeled "10" on a clean, factory-calibrated Baratza or Fellow grinder might produce completely different particle sizes compared to an identical model that has processed ten pounds of medium-roast beans without maintenance.
Proper calibration defines your grinder's true physical zero. Without a reliable reference point, dialing in dialed-in espresso parameters or adjusting pour-over flow rates becomes a guessing game. Furthermore, misaligned burrs generate a bimodal particle distribution heavy on both "fines" (microscopic dust particles under 100 microns) and "boulders" (oversized particles over 1000 microns). Fines extract almost instantly, leading to bitter astringency, while boulders under-extract, introducing harsh acidity and sour notes into the same cup.
Investing time in physical calibration guarantees consistency across bean origins, roast levels, and ambient temperature shifts. Whether you are using entry-level conical burrs or professional 64mm flat burrs, maintaining mechanical alignment preserves motor health, eliminates excessive friction, and lays the structural foundation for consistent yield percentages according to specialty coffee association (SCA) brewing control charts.
Step 1 Before Calibrating: Urnex Grindz Cleaning Tablets

Step-by-Step Guide to Finding True Zero and Calibrating Your Grinder
Before making mechanical adjustments, always unplug your electric grinder and thoroughly clean the internal grinding chamber using a stiff brass brush and a vacuum. Accumulated coffee oils, chaff, and compressed particles trapped beneath lower burr carriers can create artificial clearance problems, throwing off your calibration measurements before you even turn a screw.
Barista's tip: Never attempt to find your grinder's zero point while the hopper is full of beans or with the motor turned off. If you turn the micro-adjustment dial finer while the motor is stationary, trapped particles can wedge between the burr teeth, chipping the precision steel edges or galling the adjustment threads when powered back on.
- Prepare the Machine: Clean burrs thoroughly and remove all residual grounds from the exit chute and chamber. Reassemble the burr carrier loosely to ensure smooth thread rotation.
- Locate the Chirp Point: With the motor running empty, slowly rotate the grind setting collar or micro-adjustment knob toward the fine direction one notch at a time. Listen carefully for a faint, metallic scraping sound—often called the burr "chirp." Stop instantly the moment you hear this sound; this physical touchpoint is your true mechanical zero.
- Set or Zero the Dial: Depending on your model (such as a Eureka Mignon or Fellow Ode), adjust the outer calibration ring or loosen set screws to align the physical number "0" or indicator line directly with this chirp location. Back off the dial slightly (typically 1–2 notches fine-wards safety margin) so burrs do not contact during operation.
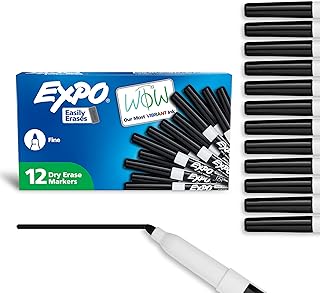
- Perform the Marker Alignment Test (Optional): To check flat burr parallelism, wipe dry-erase marker ink along the outer edge of the burr teeth. Reassemble, spin the burrs manually until they barely touch, and disassemble. If the ink is rubbed off evenly around 360 degrees, your burrs are perfectly aligned; if ink remains on one side, install ultra-thin foil shims beneath the low side of the burr carrier.
Once you complete this procedure, your numerical settings become reliable physical measurements. A shift of five macro steps will yield predictable changes in flow rate, allowing you to seamlessly explore various burr coffee grinders and brewing recipes without losing your reference points.
Dialing In Grind Profiles across Popular Brewing Methods
Zero Retention Calibration: Silicone Single-Dose Bellows

Calibrating your grinder enables precise target particle size selection calculated in microns. Espresso requires extremely tight burr spacing to generate sufficient resistance against 9 bars of pump pressure, whereas immersion methods like French press require wide gaps to allow slow thermal diffusion without clogging filter meshes.
For pour-over methods such as the Hario V60 or Chemex, accurate particle sizing controls drawdown speed. Aiming for an ideal total dissolved solids (TDS) reading between 1.25% and 1.45% requires an even, medium-fine grind size around 400 to 600 microns. If your grinder is properly calibrated, you can effortlessly make small, repeatable adjustments to compensate for bean density and roast age.
The table below summarizes essential calibration targets, brew ratios, and expected extraction timelines for major preparation styles using a calibrated grinder setup.
| Brewing Method | grind size Range (Microns) | Standard Brew Ratio | Target Brew Time | Target TDS / Yield |
|---|---|---|---|---|
| Espresso | 180 – 300 µm | 1:2.0 – 1:2.5 | 25 – 30 seconds | 8.0–12.0% TDS / 18–22% Yield |
| AeroPress | 350 – 500 µm | 1:14 – 1:16 | 1:30 – 2:00 minutes | 1.30–1.50% TDS / 19–21% Yield |
| Pour-Over (V60) | 400 – 700 µm | 1:15 – 1:17 | 2:30 – 3:30 minutes | 1.25–1.40% TDS / 18–20% Yield |
| French Press | 800 – 1000+ µm | 1:12 – 1:15 | 4:00 – 5:00 minutes | 1.35–1.50% TDS / 19–21% Yield |
Mastering these targets ensures that adjustments made to dose or temperature build upon a rock-solid, repeatable mechanical foundation. When switching between origins, referencing an established calibration baseline helps you analyze taste metrics systematically rather than guessing grind sizes.
Troubleshooting Extraction Flaws and Burr Maintenance
When coffee tastes harsh, dry, or distinctly sour, your first instinct might be to change water temperature or dose weight. However, uncalibrated grind settings are frequently the primary culprit behind poor flavor balance. under-extraction presents as a thin body, immediate sour acidity, and a quick finish, caused by excessively coarse grounds that let water pass through too rapidly. Over-extraction yields lingering astringency, intense bitterness, and a chalky mouthfeel caused by fine dust clogging water pathways.
The Pro Barista Marker Test: Non-Toxic Dry-Erase Alignment Tools
Grinder retention and static electricity also pose significant challenges to maintaining precise settings. Retention happens when grounds remain inside the lower grind chamber or exit chute between uses. If 1.5 grams of stale, fine coffee from yesterday’s dark roast gets mixed into today’s light-roast pour-over dose, your extraction yield and flavor profile will suffer. Using a bellows tool or choosing low-retention single-dosing grinders mitigates this issue and keeps calibration true across consecutive brews.
Regular maintenance directly preserves calibration stability. Steel burrs typically maintain sharp cutting surfaces for approximately 500 to 1,000 pounds of coffee throughput, while ceramic burrs can handle up to 1,500 pounds. Check burr edges periodically for dulling or nicks. Replacing worn burrs and re-establishing your true zero point restores your setup's ability to maintain optimal espresso extraction standards and pour-over clarity.
To keep your equipment operating at peak performance, establish a regular routine: perform a deep physical cleaning monthly, run dry-erase marker alignment checks annually, and check your mechanical zero point whenever you switch bean density or notice unexpected changes in shot timing.
Frequently Asked Questions
How often should I calibrate my coffee grinder?
You should verify your zero-point calibration whenever you disassemble your grinder for deep cleaning, replace burrs, or notice significant drift in brew times and flavor balance—typically every 2 to 3 months for normal home usage.
Verify Your Calibration: 0.1g Precision Scales with Timer

Can calibrating my grinder damage the burrs?
Burr damage only occurs if you allow flat or conical burrs to rub aggressively together under motor power for extended periods. Locating the zero point by listening for a light metallic chirp and backing off immediately will not harm high-carbon steel or ceramic burrs.
Why does my grind setting feel different between dark and light roast beans?
Light-roasted beans are physically denser and harder than dark-roasted beans, causing them to fracture differently under mechanical stress. Dense light roasts require slightly finer physical burr gaps and produce higher resistance, making precise calibration essential for predictable adjustments.
Sources
- Wikipedia - Coffee Grinder Mechanization
- Specialty Coffee Association (SCA) - Coffee Brewing Standards
- Baratza Technical Maintenance and Burr Alignment Documentation