Introduction: Unlocking the World of Coffee Flavor
Ever wondered how coffee professionals describe a brew with notes of "blueberry," "caramel," or "bright acidity"? They’re not just making it up! They’re using a standardized method called coffee cupping, a sensory evaluation technique that allows for objective assessment of a coffee's aroma, flavor, body, and acidity. And guess what? You can do it right in your own kitchen!
At Coffee Brew Hub, we believe that mastering coffee brewing goes hand-in-hand with understanding what makes a great cup. Cupping isn't just for pros; it's an incredible tool for home baristas and enthusiasts to deepen their appreciation, identify quality beans, and even fine-tune their brewing techniques. It empowers you to truly taste and understand the nuances in your daily brew. Ready to turn your kitchen into a personal café laboratory and start tasting like a pro?
Why Cup Coffee at Home?
- Develop Your Palate: Train your senses to identify distinct aromas and flavors.
- Compare Coffees: Evaluate different beans side-by-side to understand regional differences, roast profiles, and processing methods.
- Assess Quality: Learn to recognize freshness, defects, and desirable characteristics.
- Improve Brewing: Understand how different beans react to various brewing parameters.
- Pure Enjoyment: It's a fun, engaging, and delicious way to spend time with coffee!
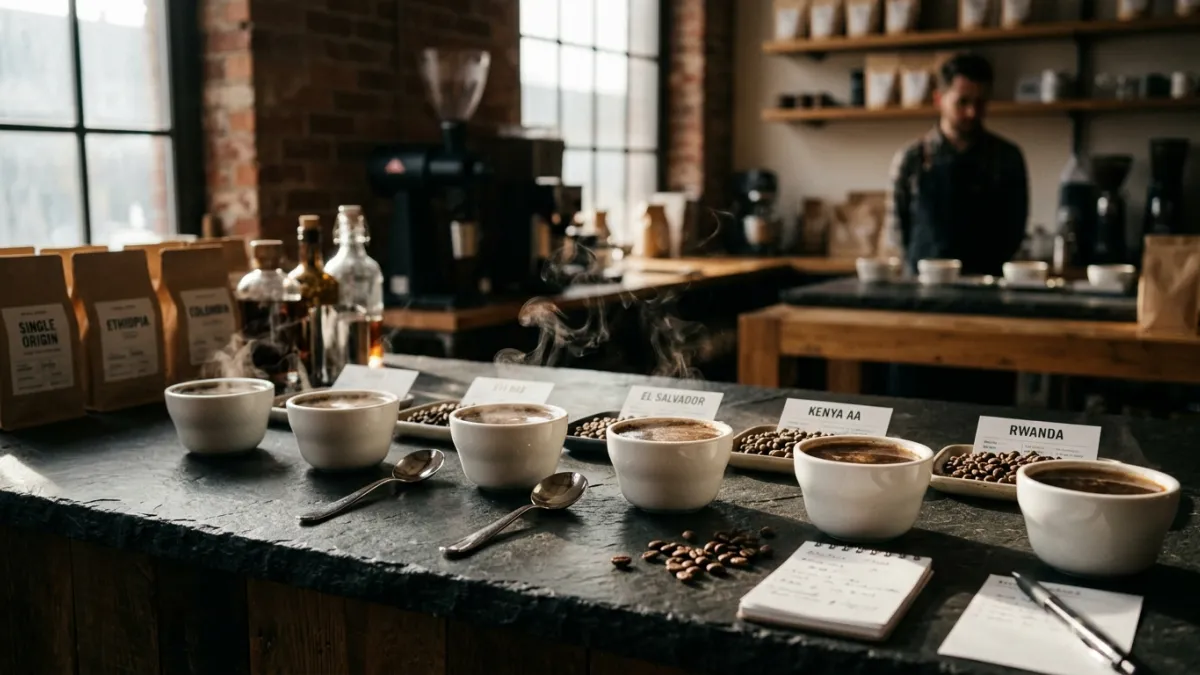
What You'll Need: Your Home Cupping Toolkit
Don't worry, you don't need fancy lab equipment. Most items are likely already in your kitchen.
The Essentials:
- Freshly Roasted Coffee Beans: Ideally 2-5 different varieties. Weigh out 11 grams per cup.
- Grinder: A good burr grinder for a consistent coarse grind, similar to French press.
- Cupping Bowls/Cups: At least one per coffee type, plus a couple of spares. Ideally 5-6 oz (150-180ml) capacity, made of glass or ceramic. Consistency is key.
- Hot Water: Filtered water, just off the boil (around 200-205°F / 93-96°C).
- Cupping Spoon: A deep, wide spoon for tasting. Any large soup spoon will do.
- Timer: Essential for consistent brewing.
- Scale: For precise measurement of coffee and water.
- Cupping Form/Notebook: To record your observations (optional but highly recommended).
- Kettle: Gooseneck kettle is preferred for controlled pouring, but any kettle works.
- Rinsing Cup: A cup of clean water for rinsing your spoon between tastings.
The Coffee Cupping Process: Step-by-Step to Tasting Like a Pro
Consistency is paramount in cupping. Try to keep all variables (water temperature, grind size, coffee-to-water ratio) as uniform as possible for each sample.
Step 1: Preparation is Key
- Weigh Your Coffee: Measure 11 grams of each whole bean coffee sample into separate cupping bowls. Label them clearly.
- Grind Evenly: Grind each sample to a coarse, even consistency (like coarse sea salt). Transfer the grounds back into their respective labeled bowls. Don't forget to purge your grinder between samples to avoid cross-contamination of flavors.
- Heat Your Water: Bring your filtered water to just off the boil (200-205°F / 93-96°C).
Step 2: Dry Fragrance – The First Impression
Before adding water, take a moment to evaluate the dry fragrance. Lean in close to each bowl and inhale deeply. What do you smell? Notes of nuts, chocolate, spices, floral? Record your initial impressions.
Step 3: The Pour – Wetting the Grounds
Start your timer. Pour 185 ml of hot water into each bowl, saturating all the grounds. The coffee should bloom and form a "crust" on the surface. Try to pour gently and avoid disturbing the coffee bed too much. Let the coffee steep for exactly 4 minutes.
Step 4: Breaking the Crust – Releasing Aromas
Once the 4 minutes are up, it's time to "break the crust." Bring your nose close to the surface of one bowl. With your cupping spoon, gently push the crust of floating grounds towards the back of the bowl three times. As you do this, take deep inhales. This action releases a burst of wet aroma, often revealing new scents not present in the dry fragrance. Repeat for each bowl.
Step 5: Skimming – Clearing the Surface
After breaking the crust, use two spoons to carefully skim off any remaining foam and floating grounds from the surface of each bowl. Discard them into a waste cup. This ensures a clean tasting experience.
Step 6: The Tasting – Slurp Your Way to Insight
Wait for the coffee to cool slightly. The ideal tasting window is typically between 8-15 minutes after the water was added (when the temperature is around 140-160°F / 60-70°C). As it cools, different flavors will emerge.
- The Slurp: Dip your cupping spoon into a sample. Bring the spoon to your mouth and noisily "slurp" the coffee. The slurp aerates the coffee, spreading it across your entire palate and maximizing flavor perception.
- Evaluate: As you slurp, pay attention to the entire experience:
- Flavor: What specific tastes do you identify? Fruit, chocolate, nuts, spices, earthy?
- Acidity: Is it bright and lively (like citrus), or dull and flat?
- Body: How does it feel in your mouth? Thin, watery, creamy, heavy?
- Finish: What aftertaste does it leave? Is it pleasant, long-lasting, bitter?
- Rinse: Rinse your spoon in the clean water between each sample to avoid flavor carryover.
- Repeat & Compare: Taste each coffee multiple times as it cools, noting how flavors evolve. Compare them directly, going back and forth between samples.
What to Listen For: Decoding the Flavors
Don't be afraid to use descriptive language! If it tastes like green apple, say "green apple." If it reminds you of toasted almonds, write that down. Common flavor categories include:
- Fruity: Citrus (lemon, orange), Berry (blueberry, raspberry), Stone Fruit (peach, apricot).
- Floral: Jasmine, rose, hibiscus.
- Nutty/Cocoa: Almond, hazelnut, chocolate, dark cocoa.
- Spicy: Cinnamon, clove, black pepper.
- Caramel/Sweet: Caramel, honey, vanilla, brown sugar.
- Roasty: Tobacco, burnt sugar, smoky (often a defect if too prominent).
- Earthy/Woody: Cedar, dirt, mushroom.
Look for balance and complexity. A truly great coffee will have multiple layers of flavor that work harmoniously.
Tips for a Successful Home Cupping Session
- Start Simple: Begin with just 2-3 coffees to avoid palate fatigue.
- Take Notes: Even simple notes help track your progress and preferences.
- Practice Regularly: Your palate will develop over time with consistent practice.
- Eliminate Distractions: Turn off music, avoid strong smells, and focus.
- Don't Be Afraid to Be Wrong: Tasting is subjective. Your unique perceptions are valid!
- Stay Hydrated: Have water on hand to cleanse your palate.
Ready to Taste Like a Pro?
Coffee cupping at home is more than just a tasting exercise; it's a journey into the heart of what makes coffee so captivating. By following these steps, you'll not only hone your sensory skills but also gain a profound appreciation for the incredible diversity of coffee. So grab your beans, set up your bowls, and embark on your own flavorful adventure. Happy slurping, fellow coffee lover!