Nitro Cold Brew at Home: Is It Possible and How to Do It?
Ever gazed longingly at that gorgeous, cascading pour of nitro cold brew at your favorite coffee shop? That velvety texture, the creamy head, the smooth, sweet sip – it’s a coffee experience like no other. And if you’ve wondered, "Can I actually make this at home?" I’m thrilled to tell you: Yes, absolutely! While it might seem intimidating, achieving that luxurious nitro effect in your own kitchen is not only possible but also surprisingly straightforward.
As your trusted barista friend, I'm here to guide you through everything you need to know, from the right equipment to the perfect pour. Get ready to elevate your cold brew game!
What Makes Nitro Cold Brew So Special?
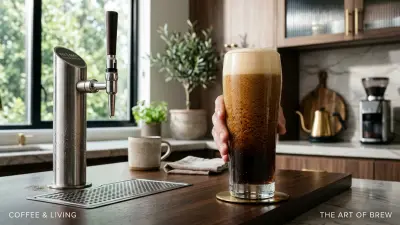
Nitro cold brew is essentially cold brew coffee infused with a gas under high pressure. This infusion creates tiny bubbles that give the coffee a thicker, creamier mouthfeel, similar to a stout beer. When dispensed, these bubbles produce the famous "cascade" effect and a beautiful, frothy head. It's often perceived as sweeter and less acidic than regular cold brew, even without added sugar, due to the way the nitrogen interacts with the coffee's flavor compounds.
What You'll Need: The Essential Gear
To embark on your home nitro journey, you'll need a few key items. Don't worry, you likely have some already, and the specialized equipment is quite accessible.
- Quality Cold Brew Base: This is non-negotiable. A great nitro starts with great cold brew. You can make your own (we’ll touch on that) or use a high-quality concentrate.
- Whipped Cream Dispenser: This is the most common and cost-effective way to make nitro cold brew at home. Look for a standard 1-pint (approximately 500ml) or 1-quart (approximately 1-liter) dispenser. Brands like iSi or Mosa are reliable choices.
- N2O (Nitrous Oxide) Cartridges: These are crucial for the infusion. You'll need 8-gram N2O chargers, typically used for making whipped cream. Important Note: While "nitro" implies nitrogen (N2), most home systems use N2O because it's more readily available and creates a similar effect at lower pressures. True N2 requires specialized keg systems.
- Tall, Clear Glassware: Essential for admiring that beautiful cascade!
- Filtered Water: For your cold brew and dilution.
For the Advanced Home Brewer (Optional): Mini Nitro Keg System
If you're serious about replicating the café experience, you could invest in a dedicated mini nitro keg system like the GrowlerWerks uKeg Nitro. These systems use actual N2 (nitrogen) cartridges, offer a more consistent pour, and can keep your nitro cold brew fresh for weeks. However, they come with a higher price tag and a bit more upkeep.
Step-by-Step Guide: Making Nitro Cold Brew at Home
Let's get brewing! This guide focuses on using a whipped cream dispenser, as it's the most practical for most home enthusiasts.
Step 1: Prepare Your Cold Brew Concentrate
If you haven't already, start with a robust cold brew concentrate. For Coffee Brew Hub readers, we recommend:
- Grind: Coarse, like sea salt.
- Ratio: 1:4 to 1:8 coffee to filtered water (e.g., 100g coffee to 800ml water for a strong concentrate).
- Steep: Combine coffee and water in a jar, stir, and refrigerate for 12-24 hours.
- Filter: Strain through a fine-mesh sieve lined with cheesecloth or a dedicated cold brew filter. For extra clarity, you can do a second filtration through a paper coffee filter.
Pro Tip: Ensure your cold brew is as smooth and sediment-free as possible. Any particles can interfere with the nitro infusion.
Step 2: Chill and Dilute Your Cold Brew
This step is critical for a great nitro. The colder your liquid, the better it will absorb and retain the gas.
- Chill: Place your cold brew concentrate in the refrigerator until it's very cold (ideally 35-40°F / 2-4°C).
- Dilute: Dilute your concentrate with cold, filtered water to your desired strength. A common starting point is a 1:1 ratio (1 part concentrate to 1 part water), but you can adjust this to 1:2 or even drink it undiluted if your concentrate isn't too strong. Aim for a total volume that fills your dispenser no more than 2/3 to 3/4 full (e.g., 300-400ml for a 1-pint dispenser).
Step 3: Charge Your Whipped Cream Dispenser
Now for the fun part – infusing the magic!
- Pour: Carefully pour the chilled, diluted cold brew into your whipped cream dispenser. Do not overfill! Leave plenty of headspace for the gas.
- Seal: Tightly screw on the dispenser head.
- Insert Cartridge: Place an 8-gram N2O cartridge into the cartridge holder and screw it onto the dispenser head until you hear the gas release and infuse the cold brew.
- Shake: Immediately and vigorously shake the dispenser for 30-60 seconds. This helps the N2O dissolve into the cold brew.
- Rest: Let the dispenser sit in the refrigerator for at least 5-10 minutes (or even longer, up to an hour) to allow the gas to fully integrate and the liquid to re-chill.
Step 4: Dispense and Enjoy Your Nitro Cold Brew!
The moment of truth!
- Prepare Glass: Grab a tall, chilled glass.
- Invert and Pour: Invert the dispenser completely, point the nozzle towards the side of your glass (not directly down the middle), and press the lever gently. Pour slowly and steadily.
- Observe the Cascade: Watch as the cold brew cascades down the glass, forming a beautiful, creamy head.
- Sip and Savor: Enjoy your homemade nitro cold brew immediately for the best experience.
Pro Tips for the Perfect Home Nitro Cold Brew
- Temperature is King: I can’t stress this enough. The colder your cold brew, the better the gas infusion and retention. Keep everything chilled!
- Don't Overfill: Leaving sufficient headspace in the dispenser is crucial for proper gas dispersion and safety.
- Experiment with Dilution: Play with your cold brew to water ratio. Some prefer a stronger, undiluted nitro, while others like it lighter.
- Shake It Well: A good shake ensures the N2O fully dissolves, giving you that signature creamy texture.
- Serve Immediately: Nitro cold brew is best enjoyed fresh from the dispenser to fully appreciate the cascade and creamy head.
- Clean Your Dispenser: Always clean your whipped cream dispenser thoroughly after each use to prevent bacteria buildup and maintain its longevity.
- Safety First: Handle N2O cartridges with care. They contain gas under pressure. Never use damaged cartridges.
The "Nitro" vs. "N2O" Distinction
A quick clarification: While commercial nitro cold brew typically uses pure nitrogen (N2) for infusion, home whipped cream dispensers use nitrous oxide (N2O). Both gases create a similar creamy texture and head, largely because N2O is very soluble in liquids and creates small, stable bubbles. True N2 systems require much higher pressures and specialized equipment to achieve the same solubility and effect, which is why N2O is the practical choice for home brewers. You'll still get that fantastic mouthfeel and cascade with N2O!
Conclusion: Your Home Barista Journey Continues!
So, there you have it! Making nitro cold brew at home is not only possible but also a delightful way to impress your guests and treat yourself to a café-quality beverage. With a good cold brew base and a simple whipped cream dispenser, you're well on your way to enjoying those velvety, cascading sips whenever you please.
Don't be afraid to experiment with different cold brew recipes and dilution ratios to find your perfect cup. Happy brewing, and enjoy your luxurious homemade nitro!