Unlock Perfect Cold Brew: The Exact Ratio for a Perfect Concentrate
Hey fellow coffee lover! If you're anything like me, you adore the smooth, low-acid deliciousness of cold brew. But let's be honest, getting it just right can feel a bit like a guessing game sometimes. Is it too strong? Too weak? Not quite hitting that sweet spot?
The secret, my friend, lies in one crucial element: the coffee-to-water ratio. Forget vague measurements; we're diving into the exact formula that will consistently deliver a perfect cold brew concentrate, ready for you to dilute and enjoy however you like. Trust me, once you nail this, your home cold brew game will be next level!
The Golden Cold Brew Concentrate Ratio: 1:4 (Coffee to Water by Weight)
For a truly robust and versatile cold brew concentrate, I recommend a 1:4 coffee to water ratio by weight.
- What does 1:4 mean? For every 1 gram of coffee, you will use 4 grams of water.
- Why by weight? This is non-negotiable for consistency. Volume measurements (like scoops or cups) can vary wildly based on grind size and bean density. A simple kitchen scale is your best friend here!
- Example: If you want to make a decent batch, start with 200 grams of whole bean coffee. That means you'll need 800 grams of water (200g coffee x 4 = 800g water). This will yield a good amount of concentrate for the week.
You might find some recipes suggesting 1:5 or even 1:8, but those often aim for a slightly weaker concentrate or even a ready-to-drink cold brew. Our 1:4 ratio delivers a rich concentrate that you'll dilute later, giving you ultimate control over the final strength.
Beyond the Ratio: Essential Elements for Cold Brew Success
While the ratio is king, a few other factors play crucial roles in crafting that perfect concentrate:
1. Grind Size: Coarse is Key!
Unlike espresso or pour-over, cold brew requires a very coarse grind. Think breadcrumbs or coarse sea salt. Why?
- Prevents over-extraction: A finer grind would extract too quickly and lead to a bitter, muddy brew.
- Easier filtration: Coarse particles are much easier to separate from the liquid, preventing sludge in your final concentrate.
If you're grinding at home, use a burr grinder set to its coarsest setting. If buying pre-ground, ask your local roaster for a "French Press" or "cold brew" grind.
2. Water Quality: Filtered is Best
Since water makes up the vast majority of your cold brew, its quality matters! Tap water can contain chlorine or other minerals that impart off-flavors. Filtered water (from a Brita, reverse osmosis system, or bottled spring water) is always recommended for the cleanest taste.
3. Brewing Time & Temperature
- Time: Aim for 12 to 18 hours. Shorter times can result in a weaker, underdeveloped flavor, while much longer than 20 hours can sometimes lead to undesirable bitter notes, especially with certain beans. I find 16 hours to be a sweet spot.
- Temperature: Room temperature (around 68-72°F or 20-22°C) generally extracts more efficiently, giving you a bolder concentrate. Brewing in the refrigerator can result in a slightly smoother, milder concentrate but will require a longer brew time (up to 24 hours).
4. Your Beans of Choice
Any coffee can be made into cold brew, but certain beans shine brighter. Medium to dark roasts often develop beautiful chocolatey, nutty, or caramel notes in cold brew. Experiment with your favorite roaster's offerings! Freshly roasted beans are always best, as they contain more aromatic compounds that contribute to flavor.
Step-by-Step: Brewing Your Perfect Cold Brew Concentrate
Ready to put that ratio to work? Here’s your actionable guide:
- Weigh Your Coffee & Water: Using your kitchen scale, measure out your desired amount of coffee (e.g., 200g) and then calculate your water (e.g., 800g for a 1:4 ratio).
- Grind Coarsely: Grind your coffee beans to a coarse consistency.
- Combine: Place the ground coffee in your brewing vessel. This could be a large jar, a French press, or a dedicated cold brew maker (like the Toddy Cold Brew System or the OXO Cold Brew Maker). Slowly add the measured filtered water, ensuring all the grounds are saturated.
- Stir Gently: Give it a gentle stir to make sure there are no dry pockets of coffee grounds. All the coffee needs to be fully immersed in the water.
- Steep: Cover your vessel and let it steep at room temperature for 12-18 hours.
- Filter: Once brewing is complete, it's time to separate the concentrate from the grounds.
- For jars: Pour the mixture through a fine-mesh strainer lined with cheesecloth or a coffee filter. You might need to do a second pass for clarity.
- For French presses: Simply depress the plunger slowly and carefully, then pour.
- For dedicated brewers: Follow the manufacturer's instructions for draining.
- Store: Transfer your beautiful cold brew concentrate to an airtight container and store it in the refrigerator. It will stay fresh for up to 1-2 weeks.
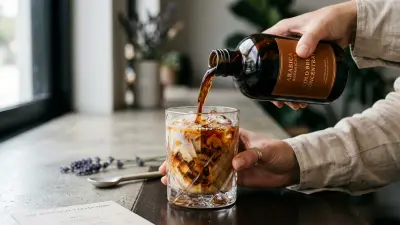
Diluting Your Concentrate: Your Personal Preference
Now for the fun part: making your drink! Remember, you've made a concentrate, so it needs dilution. This is where you can truly customize your cold brew experience.
- Starting Point: A 1:1 ratio of concentrate to water or milk is a great place to start. For example, 100ml of concentrate with 100ml of water or your favorite milk.
- Adjust to Taste: If you prefer a stronger brew, try 2 parts concentrate to 1 part water/milk. For a lighter, more refreshing drink, go for 1 part concentrate to 2 parts water/milk.
- Ice is your friend: Don't forget a generous amount of ice!
Final Thoughts: Experiment and Enjoy!
With the 1:4 coffee-to-water ratio as your foundation, you're well on your way to consistently excellent cold brew concentrate. Don't be afraid to tweak the brewing time by an hour or two, or experiment with different dilution ratios to find what truly sings to your palate. Happy brewing, and enjoy that incredibly smooth, delicious cold brew!